Friday, 26 November 2021

The Micro-R-Press and the long way to get there.

 Some month agao, Bill Ritchie asked me about laser-cutting from 3 mm plywood, to make a print-press.

He sent me the illustrator files of his "Mini-Rembrandt-Press" (old name = "WeeWoody Rembrandt-Press"). I translated some messures from inch into cm, add a handweel and start cutting. It needs some hours, but afeter this, I starded with the assembly, but failed partially. The result, I called "Qusimodo-Press", cause it became crooked, but ist works, 'cause the rollers are still parallel...

Now it is so, that the print format is "ATC"-size. The size of (Artists) Trading Cards.

But the smallest size, I'm working with is 4 x cm.

So I've had an idea:

Press shink to 55% of the Original.


Ok, this is only an model, to find out the right design, but it is for 4 x 4 cm-prints on 5 x5 cm paper!

So I took on the challenge of constructing all parts, also the rollers of the press, from 3 mm plywood.

Laser cutten plywood and the drawing of that plate.


Next step was to realise a working-model of the Micro"R"Press, as I called it.

And it works, I could assambly the prototype of a Micro"R"Press.

The Micro"R"Press with its gear(s).

I prefer a gear drive version, like the first "WeeWoody Rewmbradt Press". This means fixed rollers, but better power transmission.

And so I started to test differend printing-plates:

Different plates, I used.

Then I've had the idea to print a booklet in 5 x 5 cm. That need printing-plates fora paper size of 5 x 10 cm, or bigger. So I made a "long-printing-bed":

Long-printing-bed wit print and cliche.


The finished booklet, 5 x 5 cm.

But then, the press blocked... the handweel didn't go forward, or back...SHOCK.

Early end of a great idea?

I thought about an find a way to catch the big pressure, by adding "side-supports" for the rollers:

New version of the press with "roller-supports" at the sides.

And now, the Micro"R"Press is perfect for printing:

With the "universal-long-bed" it is possible to print 5 x10 with no problems. So stamps, for exsample. The print-plate, and later, the perforation is made with the same lasercutter, I've used to cut the parts of the press.

In the meantime, I've also made a manual for assambly the parts of the press:

Three pages of the manual in german / english.

 The first "DIY-Kit", just out of the laser has arrieved in Seattle now.

The press is no chidren's toy, but a nice tool, on the desk for making just a print, if you have an idea.

Best materials for the print-plates are photopolymere (clear-stamps), or soft-cut-plates. But with some practice, it is possible to print etchings (intaglio).

Vision and Realisation.


Saturday, 8 May 2021

Thermofaxprint „quick&dirty“ with floating Motives & Material-Print

The Thermofaxprint "quick&dirty" with floating Motives. Size = A6
 

You know, that artworks often arises during their development process.
In prints, the motive usually is given.
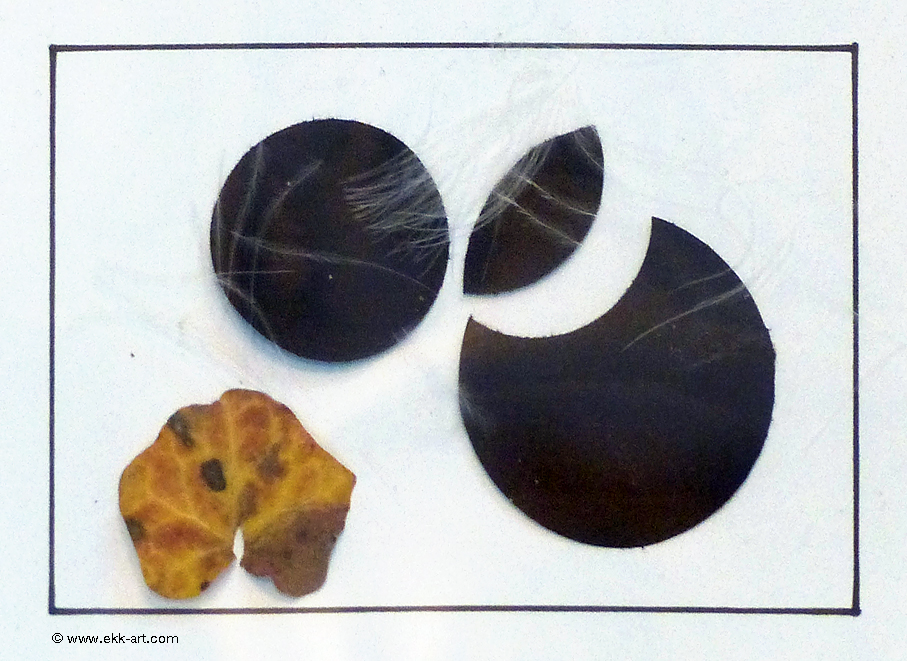
Another point is, using thin things (leafs, feathers,…) in the lay-out of a (screen-, intaglio-)print.

The cheap thermo-copier with 200 dpi solution.

This time I did both: move/exchange the elements after every printing pass and use leafs and and parts of feathers.
For this I used the simple „China-Tattoo-Copier“ and the thermofax-master vom „Gestetner“ (now available from „Ricoh“).
Additional I covered the carrier (240 g/qm paper) with a thin, clear plastic film.
Between carrier and plastic film, I put the items.

The thermofax-master I printed as usually (see here).
For this trial I used the CMYK-colors, show the different levels more simple.
The pur printing-time is very short: for the 4 colors I need less then 2 hours (12 copies).
Between the 2nd. color, the prints needed 2 hours to dry, after the 3rd color I let them dry overnight.

For a quick result, I use the size of a postcard.
The „China-Tattoo-Copier“ is limited to the size of A4, but you can use this size (or a smaller one) as pattern for printing on bigger formats, or fabric (for example with T-Shirt-Colors). Similar to the traditional thermofax-print,.

The carrier with the covering plastic film.

The items for the yellow-print. Black paper, feathers.

 
Yellow printing with thermofax-master from "Gestetner" / "Ricoh"
 
The items for the magenta-print. Paper + leaf.

The items for the cyan-print. Paper + parts of feathers.

The leaf for the black-print.


Printed card in the stand.
Have a good print and stay healthy
-ekk-

Thursday, 4 February 2021

#WBZ, the next 4 Cards

Phuu, es ist wie mit dem Virus: alles dauert länger, als gehofft, und dazwischen machen wir "viele Erfahrungen".
Doch wie dem auch sei, die nächsten 4 Karten sind gedruckt, die Belegexemplare verteilt, an F., Brigitte + Hans-Jürgen, an Lorenz und an Paul.

Fangen wir mit der Karte von F. an. Kein leichtes Unterfangen, doch das Wort "Corona" auf ihrem Stundenplan gab mir den "roten Faden vor.

Phuu, it's like the virus: everything is taking longer than we had hoped, and in between
we have "a lot of experiences".
Be that as it may, the next 4 cards have been printed, the specimen copies distributed,
to F., Brigitte + Hans-Jürgen, Lorenz and Paul.

Let's start with the picture from F. Not an easy undertaking, but the word "Corona"
on your timetable gave me the "central theme".

Die Vorlage.

Ich entschloss mich, den Ausschnitt im Thermofax-Druck, mit einem Hot-Embossing-Effekt zu drucken.

I decided to use thermofax printing to print the cutout with a hot embossing effect.

Der Scan vom fertigen Druck.

Etwas verwinkelt abfotografiert, um den Glitzer mehr zur Geltung zu bringen.

 Die Karte für Brigitte und Hans-Jürgen war ein echter "Challange". Um Beiden gerecht zu werden, habe ich die Themen Fotografie und Briefmarken miteinander verbunden. Das Lay-out der Fotos und Texte gehört zur Arbeit von beiden, eine Vorarbeit zu Brigittes neuem Buch.

The card for Brigitte and Hans-Jürgen was a real "challenge". In order to do both justice,
I combined the subjects of photography and postage stamps. The layout of the photos and
texts is part of the work of both, a preliminary work
Brigittes new Buch.

Die Vorlage von Brigitte + Hans-Jürgen zur #WBZ-Postkarte.

Das Ergebnis: Thermofaxdruck und Lasergravur (die Perforation).

Die Rückseite der Karte mit einer Gummierung (Siebdruck)


Es ist immer wieder spannend verschiedenste Techniken und Geräte für die Erstellung eines Produktes zu nutzen. Oder auch: mal wieder "viel Erfahrungen gemacht" ;-)It is always exciting to use a wide variety of techniques and devices to create a product.
Or also: once again "had a lot of experience" ;-)


Wednesday, 3 February 2021

# WBZ-Postkarten, 2. Teil

 (wie es scheint ist die Länge der Posts inzwischen begrenzt, darum diesmal in 3 Teilen.)

(It seems the length of the posts is now limited, so this time in 3 parts.)

Die Vorlage von Lorenz


Ich wusste von Anfang an, dass hier Reduktion das Schlüsselwort ist. So erstellte ich eine Laser-Xylogravur als Ausgang, Drucke diese auf feuchtes Tiefdruckpapier als Blind-Prägung mit Gold an einzelnen Stellen. Als Druckmaschine diente wieder einmal die solide Mini-Halfwood-Presse.

I knew from the start that reduction was the key here. So I created a laser xylogravure
as an output, printed it on damp gravure paper as a blind embossing with gold in individual places.
Once again, the solid was used as the printing machine
Mini-Halfwood-Press.

Im Scan ist nicht viel zu sehen, darum folgen noch Fotos mit mehr Schattenwurf.
Not much can be seen in the scan, so photos with more shadows follow.
 
.

Die mit einem Laser gravierte Druckplatte für Prägung/Druck (Laser-Xylogravur).


The printing plate engraved with a laser for embossing / printing (Laser-Xylogravur).

W.g. der unebenen Oberfläche musste ich die Rückseite im Buchdruck bedrucken (mit der Adana 8 x 5"). Because of the uneven surface, I had to print the back using letterpress (with the Adana 8 x 5").

Die Rückseite der Karte.

Der Bleisatz und die Adress-Linie für die Rückseite. The lead type and the address line for the back.
Leider habe ist der Karton immer noch etwas gewölbt, hoffe dass er sich mit der Zeit und leichtem Druck plan legt ;-)
Unfortunately, the box is still a bit arched, hope that it will lie flat over time and with light pressure ;-)

Tuesday, 2 February 2021

#WBZ-Karten, Teil 3

 Last, but not least die Karte von Paul mit "seinen" zwei Dohlen.
Last, but not least, Paul's card with "his" two jackdaws.
Das Original-Foto von Paul.

Um dem "Corona" Rechnung zu tragen, versetzte ich die vordere Dohle in Rotation. Jetzt bildet sie gefährliches "schwarzes Loch", welches virenmässig alles verschluckt. Wie bei den alten Ägyptern bilden nun zwei Dohlen die Wächter des Portals. Deren Status, wird ebenfalls durch einen goldenen Schabel symbolisiert.

In order to take the "Corona" into account, I set the front jackdaw to rotate.
Now it forms a dangerous "black hole", which swallows everything in terms of viruses.
As with the ancient Egyptians, two jackdaws now form the guardians of the portal.
Their status is also symbolized by a golden shield.

Hier der Thermofax-Druck in 3 Farben mit goldenem Hot-Embossing.


Here the Thermofax print in 3 colors with golden hot embossing.

Thursday, 22 October 2020

Printing with Polymer-Clay, A Study of Feasibility

Some weeks ago, Bill Ritchie, inventor of the Mini-Halfwood-Press asked me, how polymer-clay can be used as printing-plate.
An interesting idea, I thought. But in the web, I found nothin about. 
So I started a serial of trails.
(About,how to bake polymer clay, you can find lots of videos on "youtube".)

I used „Cernit Number One“-polymer clay.
As I can read on different online-publications, it is possible to mix different brands of clay, also to make harder clay smoother.
For conditioning the clay, a pasta-machine is perfect, but an acrylic-roller is fine, too. 
(More about, at youtube.)

Block-Printing & Embossing (with the Mini Halfwood-Press)
As "master" (form) I used a laser-engraved MDF, 3 mm, deepness about 0.75 mm.
As release agent, between wood and clay I used water from a spray-bottle.
The clay contents oil, this makes the used (offset-)ink more smoother, less sharp in printing.
Because of the uneven surface, also the inking of the clay-cliche was not so easy, and fare from perfect.
 
Messure in cm. Master, Polymer-Clay-Cliche
Embossing and Block-Print


Embossing, made from polymer-clay on damped paper, is no problem, it comes perfect.

"Pseudo"-Mezzotinto (printed with the Mini Halfwood-Press)
Then I tried a kind of mezzotinto: 
after pressing (with the Halfwood) a sandpaper (grain 100) on the fresh clay, I baked it. 
Then I used a scalpel (Xacto-Knife with a roundet blade) and scratched a form into the clay-
To smooth the surface partly. The smoothed parts takes less ink, becomes lighter.
 
"Pseudo"-Mezzotinto
 
Cold-Point Intaglio (printed with the Mini Halfwood-Press)
Into the 2nd. plate of clay, I scratched lines with drypoint-intaglio needles. It works, but the the surface was too raw.
So I smoothed the surface with sandpaper, up to 2000er grain. 
Still, there are darker spots on the print. At that parts the plate was a little bit deeper and I didn't sand it down perfect enough.

Cold-Point-Intaglio, Plate & Print

The Plate with engraved Lines.
 
It was a very interessting journey into the world of polymer.clay.
I've been really impressed by the "pseudo"-mezzotinto. 
This technic with a plate of polymer-clay, I'll use also in future, ...in multi-color prints, of course ;-)

If you like to test "printing with polymer-clay", please drop a line.

Thank you & stay healthy
-ekk-

Friday, 14 August 2020

#WBZ, die Fünfte Karte

 Angelika hatte mir mehrere Fotos von dem Baum gesandt. Aufgenommen an verschiedenen Tagen.


Davon habe ich vier Ansichten ausgewählt, diese übereinander gelegt und im Thermofax-Druck und Hot-Embossing-Verfahren zu meiner Interpretation zusammengefügt.


Leider ist der Embossing-Effekt im Scan wenig sichtbar, darum noch ein Foto aus anderer Perspektive:


Angelika hat diesen Baum täglich im Blick. Nicht nur die wechselnde Beleuchtung fasziniert sie, es sind auch die Bewohner: Tauben.
Diese verbreiten ja selber Viren und sind kaum zu stoppen, so dass ihr Verhalten ebenso einem Virus ähnelt. Aufgrund der Druckauflösung sind die Tauben nicht mehr erkennbar... aber sie sind da. Echt.

..................

Angelika had sent me several photos of the tree. Recorded on different days.
(1st Photo)
I have selected four views, placed them on top of each other and put them together for my interpretation using thermofax printing and hot embossing.
(2nd Photo)
Unfortunately, the embossing effect is hardly visible in the scan, so a photo from a different perspective:
(last Photo)
Angelika keeps an eye on this tree every day. They are not only fascinated by the changing lighting, but also by the residents: pigeons.
These spread viruses themselves and can hardly be stopped, so that their behavior also resembles a virus. Due to the print resolution, the pigeons are no longer recognizable ... but they are there. Really.


Friday, 29 May 2020

#WBZ, die Vierte Postkarte

Steffis Blick aus dem #WirBleibenZuhause

"Eigentlich" hatte ich sofort eine Idee für die Umsetzung von Steffis Bild. Doch heute, 5 Wochen später weiss ich, dass Idee und Umsetzung beileibe nicht das Gleiche ist.

"Actually" I immediately had an idea for the implementation of Steffis view. But today, 5 weeks later, I know that idea and implementation are by no means the same.

v.l.n.r; der erste Versuch in rot/grün, der 2. Versuch in Gold und im Siebdruck, + der 1. Stempel für das HotEmbossing.

Von dem Bild sind mir die Pflanzen + der Maschendrahtzaum hängen geblieben.
Darum dachte ich mir, ganz einfach, den Rest vergretuschieren und dann die Pflanzen + Hintergrund in grün drucken, den Maschnendrahtzaun  + Hintergrund in Rot... hat aber nicht so geklappt, denn anstatt einen dunklen Braunton, erzeugte die Mischung nur ein helles Braun. Der Maschendrahtzaun geht dabei ganz unter...
Darum ein neuer Versuch. damit die Farbe schön satt kommt, im Siebdruck (Serigrafie).
Diesmal gefällt der gold/schwarz-Kontrast zwar, aber von dem Blattwerk geht zu viel verloren. Der rote Zaum ist auch zu "dünn". Dabei fiel mir auf, dass der 2. Zaun irgendwie "sinnlos" eingesetzt ist.
Mir war aber die Wiederholung des Zauns wichtig, um zu verdeutlichen.
Also einen dritten Ansatz wagen...
Diesmal wieder im Thermofaxdruck "quick&dirty" und die beiden Maschendrahtzäune als HotEmbossing hervorheben. So bin ich zum ersten Mal nach ziemlich genau 1 Jahr wieder an die Stempelproduktion gegangen. Und habe promt einen Fehler gemacht: die Abdeckfolie für die Stempelmasse (Photopolymere) war nicht gespannt und erzeugte so auf der Oberfläche des Stempels Wellen... arrrgh!
Okay... neuen Stempel gemacht und, nach ein paar Anpassungen an der neuen Stempel-Positionierungs-Hilfe endlich HotEmbossed. "Dear Scrap-book-ladies from YouTube, thank you so much!"

From the picture I got the plants + the wire mesh bridle.
So I thought, quite simply, to cover up the rest and then print the plants + background in green, the wire mesh fence + background in red ... but it didn't work out, because instead of a dark brown tone, the mixing only produced a light brown. The chain link fence goes down completely ...
Therefore a new attempt. so that the color comes out rich, in screen printing (serigraphy).
This time the gold / black contrast is nice, but too much is lost from the foliage. The red bridle is too "thin" too. It struck me that the second fence is somehow "useless".
But repeating the fence was important to me to make it clear.
So take a third approach ...
This time again in thermal fax printing "quick & dirty" and highlight the two chain link fences as HotEmbossing. So I went back to stamp production for the first time after almost exactly 1 year. And I quickly made a mistake: the cover film for the stamp mass (photopolymers) was not stretched and generated waves on the surface of the stamp ... arrrgh!
Okay ... new stamp made and, after a few adjustments to the new stamp positioning help, finally HotEmbossed. "Dear Scrap-book-ladies from YouTube, thank you so much!"


HotEmbossing mit Gold-Pulver aus der Nähe betrachtet.

Und zu guter Letzt, das Machwerk, die vierte "WBZ-Karte", mit den beiden Maschendrähten als "Tor" ins Grüne:

And last but not least, the Machwerk, the fourth "WBZ card", with the two wire mesh as a "gate" into the green:

Thermofaxdruck"q&d" in 3 Farben (hellgrün, dunkelgrün, schwarz + HotEmbossing in gold.

Herzliche Grüsze & bleibt.. ach, ihr wisst schon
Warm regards & stays .. oh, you know
 
-ekk-


Saturday, 23 May 2020

#WirBleibenZuhause, die DRITTE

...langsam komme ich (drucktechnisch wieder in Gang. Heute kann ich die 3. Karte der Serie vorstellen.
Zuerst das Foto von Jean-Louis:

... slowly I'm getting back into the printing process. Today I can present the 3rd card of the series.First the photo of Jean-Louis:

Jean-Louis Selfie, Zürich / Schweiz.

...zuerst hatte mich die Möve, oben links, inspiriert. Diese wollte ich, von Artgenossen unterstützt, als Wirbel um Jean-Louis Kopf fliegen lassen.
Doch viel mir noch rechtzeitig Jean-Louis Freude über die Arbeiten von Roy Lichtenstein ein.
Also Comic. Mit viel Pixelschupsterei und einem Mix aus Thermofaxdruck "quick&dirty" und dem Hand-Siebdruck (Seriegrafie), ist dann meine Version des Selfies entstanden.

... first the gull, on the top left, inspired me. I wanted to let them fly as swirls around Jean-Louis' head, supported by congenial. But in time, Jean-Louis made me happy about Roy Lichtenstein's work. So comic. My version of the selfie was created with a lot of pixelation and a mix of thermal fax printing "quick & dirty" and hand-screen printing (serigraphy).

Comic-Version des Selfies in 5 Farben, mit 2 verschiedenen Drucktechniken.

Tricky beim Druck ist noch, dass sie die Thermo-Druckfolie in Druckrichtung verzieht.
Beim hand-Siebdruck passiert das nicht. Ich musste in dem Fall den Film für die Belichtung des Siebes um 1.41 mm in der Höhe verzerren, damit der Druck genau auf den Thermofaxdruck passt.
Den abschliessenden 5. Druckgang machte ich wieder im Thermofaxdruck.
Gespannt auf den 4. Druck?
Kommt bald.

The tricky thing about printing is that it warps the thermal printing film in the printing direction.
This does not happen with hand screen printing. In this case, I had to distort the film for the exposure of the screen by 1.41 mm in height so that the print fits the thermofax print exactly.
I made the final 5th print run again in thermofax printing.Looking forward to the 4th print?
Coming soon.


Herzlich
-ekk-

Tuesday, 12 May 2020

Zwischen-Akt (acting "inbetween")

Die Druckversuche haben mich echt gefordert, immer wieder die Enttäuschung überwinden und nochmals zurück auf Anfang...
Doch es gab auch Schönes in der Zeit.
Der Kontakt zum Konstrukteur der Mini Halfwood-Presse, Bill Ritchie, zB.
Angefangen hat es mit dem Hinweis auf den Tetra-Druck, in seinem Newsletter. Der Rest ist Video:
https://www.youtube.com/watch?v=EhGywIF6ahA&t=432s

The print- tests really challenged me, overcoming the disappointment and back to the beginning again...
But there were also beautiful things in this time.
The contact to the designer of the Mini Halfwood press, Bill Ritchie, e.g.
It started with the reference to Tetra-printing in its newsletter. The rest is video:
https://www.youtube.com/watch?v=EhGywIF6ahA&t=432s

Was lange währt...

Phuuu, dat warn Ding.
Ich habe jetzt tatsächlich fast 4 Wochen gebraucht, um mit dem Thermofaxdruck "quick&dirty" wieder zurande zu kommen. Um es kurz zu machen: Probleme mit der Farbe, fehlende Übung im "Würgfloh" und ein Wunsch nach zu viel Perfektion, waren die Ursache. Dabei habe ich "meine Drucktechnik" ja selber als "quick&dirty" bezeichnet...

Phuuu, dat warn thing.
It actually took me almost 4 weeks to get to grips with the "quick & dirty" thermal fax printing. In short: problems with the color, lack of practice in the "gag flea" and a desire for too much perfection were the cause. I called "my printing technology" myself "quick & dirty" ...


Eine kleune Auswahl aus 4 Wochen Test-Druckerei.

Nun zum heutigen Druck von Anitas Foto aus ihrem "Basar Bizarr"
https://basarbizarr.ch/:
Now, the print of today from Anitas selfie made in her "Basar Bizarr:
https://basarbizarr.ch/:
Selfie mit Maske

Beim Betrachten addierte ich gleich die sie umschwärmenden Viren.
Spontan kam mir einen Szene aus den 60ern in den Sinn:
https://de.wikipedia.org/wiki/Raumpatrouille_%E2%80%93_Die_phantastischen_Abenteuer_des_Raumschiffes_Orion
Genau, die FROGS, sie waren für mich, mit 13 Jahren, das Virus schlechthin, denn sie kamen von "aussen" und wollten die Menschen vernichten.
So umschwärmt Anita jetzt eine Wolke aus Frog-Raumern...

When I looked at it, I immediately added the viruses swarming around it.
A scene from the 1960s came to mind spontaneously:
https://de.wikipedia.org/wiki/Raumpatrouille_%E2%80%93_Die_phantastischen_Abventure_des_Raumschiffes_Orion
Exactly, the FROGS, for me, at the age of 13, they were the virus par excellence, because they came from "outside" and wanted to destroy people.
So Anita now swarms around a cloud of frog spaces ...


#wirbleibenzuhause - Druck, 4-farbiger Thermofaxdruck + Serigrafie (Gold).


Mehr zu der Aktion und dem "Druck-Montag" auf:
http://www.druck-montag.kurse-sg.ch/
More about this actoon an the "Druck-Montag":
http://www.druck-montag.kurse-sg.ch/